Getting started with Balea in ASP.NET Core
In this article, we are going to see how easy it is to use Balea in your ASP.NET Core application using the NuGet packages provided by Xabaril.
> In samples/WebApp you’ll find a complete Balea example in ASP.NET Core.
Setup
To install Balea open a console window and type the following command using the .NET Core CLI:
dotnet package add Balea.Configuration.Store
or using Powershell or Package Manager:
Install-Package Balea.Configuration.Store
or install via NuGet.
In the ConfigureServices method of Startup.cs, register the Balea services:
services
  .AddBalea()
  .AddConfigurationStore(Configuration);
AddBalea method allows you to register the set of services that Balea needs to work. The AddConfigurationStore method registers the configuration store to use, in this case, based on the default configuration system of ASP.NET Core
By default Balea use a configuration section called Balea but you can change if you want:
services
  .AddBalea()
  .AddConfigurationStore(Configuration, key: "your key");
Defining applications
Applications allow you to manage authorization in multiple different software projects. Each application has its own unique roles and delegations. If you have a simple scenario where you only have one application, Balea give you a default application name called “default”:
{
  "Balea": {
    "applications": [
      {
        "name": "default"
      }
    ]
  }
}
Or you can create as many applications as you want:
{
  "Balea": {
    "applications": [
      {
        "name": "hr"
      },
      {
        "name": "erp"
      }
    ]
  }
}
And you could specify which application do you want to use:
services
  .AddBalea(options => options.SetApplicationName("hr"))
  .AddConfigurationStore(Configuration);
Defining roles
Define roles is a straightforward proccess. Name the role, add a description, enable it and add permissions:
{
  "Balea": {
    "applications": [
      {
        "name": "default",
        "roles": [
          {
            "name": "teacher",
            "description": "Teacher role",
            "enabled": true,
            "permissions": [
              "grades.edit",
              "grades.view"
            ]
          }
      }
    ]
  }
}
Additionaly, roles coming from authentication system can be mapped to the application roles:
{
  "Balea": {
    "applications": [
      {
        "name": "default",
        "roles": [
          {
            "name": "student",
            "description": "Student role",
            "enabled": true,
            "permissions": [
              "grades.view"
            ],
            "mappings": [
              "customer"
            ]
          }
      }
    ]
  }
}
Using roles in our controller and actions
By default, Balea automatically maps roles and permissions to the user’s claims. This is mainly useful if you want to use the standard claims API or the [Authorize] attribute. For example:
[Authorize(Roles = "custodian")]
public IActionResult OpenDoor()
{
    return View();
}
Or using the standard claims API:
public IActionResult OpenDoor()
{
    if (User.IsInRole("custodian"))
    {
        return View();
    }

    return Forbid();
}
Using permissions in ASP.NET Core authorization policies
Also, Balea automatically maps permissions to ASP.NET Core authorization policies. You’ll need to decorate your controllers/actions like this:
[Authorize(Policy = "grades.view")]
public IActionResult ViewGrades()
{
    return View();
}
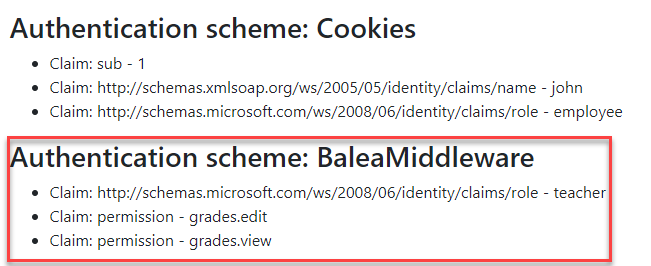
Testing the authorization
If you run the example samples/WebApp you could see that Balea creates on the fly a new ClaimsIdentity with all the information from the authorization store for the user: